mountain hut in watercolour - step by step
 |
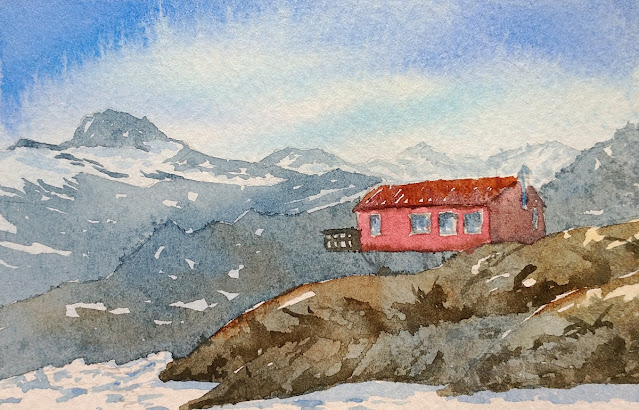
| Watercolour postcard of Colin Todd Hut, Mount Aspiring National Park. |
It's been ages since I did a step by step painting. So here's a little postcard with a view of Colin Todd Hut in Mount Aspiring National Park, New Zealand. I worked from a photo I took way back in January 2012 when David, Alexis and I climbed Mt Aspiring - one of my favourite adventures of all time.
I tried to take each photo when the paint was still wet. That way you can see the colour just as I laid it down and then the difference in the next shot with the paint dry.
Let's go!
 |
| Step 1 - sky |
Step 1
I tape the postcard on all sides to a stiff piece of card and then draw the scene lightly in pencil. For the drawing I concentrate on getting the hut fairly accurate and in a good position for a nice composition - the hut is my focal point.
I wet the whole sky and all of the background hills with clean water and then paint the sky. I use Ultramarine Blue for the top of the sky and Pthalo blue towards the horizon and over the back hills. This will give my scene a lovely sense of depth.
I wait for this to dry fully before going on to step 2.
 |
| Step 2 - far away mountains |
Step 2
Using Indigo and a fairly large brush I start by painting the rocks and shadows on the furthest away mountains. Using a big brush means I'm unable to add tiny details and the marks will be loose and free. The mountains furtherest away have a watery mix with almost no pigment and I increase the saturation as I come forward - still keeping these mountains very light. I add a little Ultramarine Blue onto the snow for some shadows.
I let this dry.
 |
| Step 3 - closer ridge |
Step 3
For the ridge closer to the hut I add a bit of Burnt Umber to the Indigo and make a more saturated mix. I still keep this very light and use a big brush. I paint some areas in Indigo, and some in a Indigo / Burnt Umber mix, allowing the colours to merge softly. I still don't want any detail in this area, but the addition of the Burnt Umber to the mix will bring this ridge forward in front of the other background mountains.
I let this dry.
 |
| Step 4 - foreground snow and rocks |
Step 4
For the foreground rocks I use a mix of Indigo, Burnt Umber and Raw Sienna. I pop the Raw Sienna just along the tops where the sun is catching and then vary the rest of the rock area with Indigo and Burnt Umber. I want this area of rocks to have a lot more colour variation than the back hills and more saturation.
I add a few shadow marks to the snow on the glacier in the foreground using the Ultramarine Blue and Pthalo Blue that I used for the sky.
I let this dry.
 |
| Step 5 - rock crevices |
Step 5
I change to a slightly smaller brush and work some detail into the foreground rocks adding cracks and crevices. I first start with a very light grey/brown mix of Indigo and Burnt Umber and then while this still wet I darken some of the marks. I also tease out some of the wet strokes to make very fine marks. The idea here is to vary the cracks in colour, tone and detail, while concentrating on following the form with your strokes. Nature is very random and it can help to look carefully at your reference photo to see what direction the cracks are going and how they vary in size and shape.
 |
| Step 6 - the hut |
Step 6
For the hut I change to a tiny flat brush and block in each of the red sides. I use a combination of red colours and a bit of Paynes Grey to give the hut a weathered look. I add a touch of dark colour along the bottom of the walls and roof to give them weight.
Using the sky colour I paint the windows and the air vent chimney.
I let this dry thoroughly before the penwork in Step 7.
 |
| Step 7 - penwork |
Step 7
Finally I add fine pen markings to define the hut. I use a combination of dark brown, black and white ink to bring the hut into focus. I add a title and sign the postcard.
All that's left to do is seal it with an acrylic spray varnish, add a note, address and stamp and let it wing it's way to someone special.
Happy painting!
PS : on Sunday 16th January 2022 (15th January for some time zones) I'll be doing a live online class where we paint a far more detailed New Zealand mountain scene. Classes are small and intimate and so much fun. Why not join me and paint along? Details here.

