painting a white flower in watercolour
 |
| Mount Cook Lilies - white flowers in watercolour |
Painting white flowers (or any white object!) in watercolour provides a wonderful challenge. It's a bit of puzzle, really, and takes quite a lot of planning before the brush hits the paper. Here's how I approached these Mount Cook Lilies.
Choosing the photograph
Before I started, I chose a good photograph. This is a very important step. I worked from a photo I took while out hiking last week. When I take photographs of flowers that I'm planning to paint from, I think a little differently than when I'm trying to capture the perfect photo. I'm interested in having everything in focus, wide cropping so that I can see all of flowers and at least some full leaves. I like a strong, contrasty light with lots of shadows. The perfect photo for a print would be quite a different thing. I take lots of photos, because often I compose a painting from a few photos, so that I can get a full bloom and a bud, for instance.
Also, it's super helpful if you can sketch from the real flower first before working from a photo. I did a sketch onsite of a few flowers, and this allowed me to look at the flowers from all angles and see them more as a 3D form. Photos can be so flat!
First wash
 |
| Painting white flowers in watercolour - first wash |
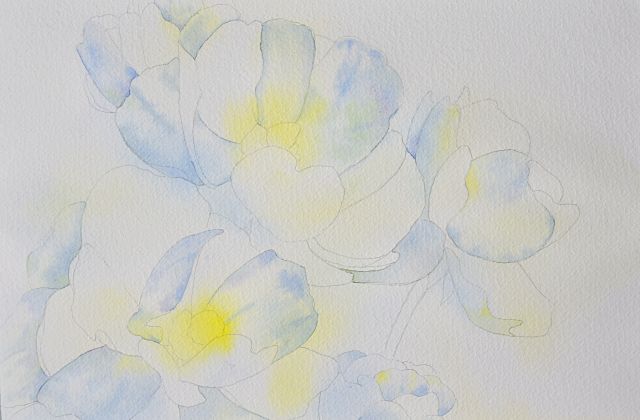
I mix up a very light washes of Hansa Yellow Medium and Cobalt Blue. Almost no pigment. I wet the whole paper and drop these colours in while the paper is wet. The centre of the flowers is yellow and I drop the blue on the shadow side and the yellow on the sun side. I allow this to fully dry.
Second wash
 |
| Painting white flowers in watercolour - second wash |
I dampen one petal at a time and paint in the shadow colours - these are what I guess you could call the form shadows, not the shadows cast by the petals on to each other or cast shadows from other objects.
If you look very carefully at each petal you will often notice they're not completely white and the shadows are not completely grey. All objects reflect the colours from their surroundings, but white objects even more so. Taking this into account I paint the shadows in very light mix of ultramarine blue, hansa yellow medium, sap green and permanent violet.
I work on petals that are not touching, allowing them to dry before painting a neighbour. So in the photo above you can see some of the petals done, and the photo below the whole second wash is complete.
 |
| Second wash complete |
Cast shadows
 |
| Painting a white flower in watercolour - cast shadows |
This is where the flower suddenly becomes wonderfully 3D. Although it's quite exciting and the temptation is to really make the flower pop with lots of colour, I do reign myself in and keep the washes very, very light. Because this now the third glaze of colour, it can go dark quicker than you think and it pays to remember that the flower is white ;-)
The cast shadows can also have lots of colour variation in them, so to keep it interesting I drop in blue, yellow, purple or green into the shadows as I see them.
I work with two brushes at once at this stage, a small, pointy no4 brush to wash in the shadow and a teeny, tiny no0 to drag colour from each wet area into very tight areas, or to form veins or edges. I work slowly around the painting and can go back to an area when it's dry to strengthen it if I have to.
Details
 |
| Painting a white flower in watercolour - finishing the petals |
Working with a very tiny no.0 brush I place the darkest darks as I see them. I try not to just outline each petal, but rather look carefully to see where the darkest areas are. For the veins in the petals, I'm careful to follow the form.
Final stage - background
 |
| Painting a white flower in watercolour - adding the background |

